Posts tonen met het label elfia. Alle posts tonen

donderdag 28 december 2017

Drindl dress


I don't have a lot of pictures of this dress and not even making off pictures. So perhapes this will be a short post. You see here the front, I used Burda 7057. I'm not that a great fan of Burda in the first place, the one time I made earlier back in 2013, it came so terribly out I can't even rework the dress. But I wanted to give Burda another try. This time it was better, but there where still parts I don't like about how the dress turnt out. 

 I think Burda would never grow on me.... But good, this dress it's not really groundbreaking. It's fun, but no more than that. I think to wear it with easy or hot events if I don't want something restricted of difficult to put on. What I would want to chance if I ever get in me head to do this pattern again.... I would begin with lenghten the bodice. I have a short torso, but this is ridiculous!! Even for me this bodice came in to short. And second, add boning. The instructions don't ask for them, but it would straight out the bodice and would look more pleasing for the eye. This would be the only two things, but for me they would be a game changer. What I changed this time about the pattern? I changed the skirt so the embroidery would match more and add some pockets. Pockets do everything. 


 So I don't think I have to tell more about this dress. It isn't that a accomplishment.. I hope to have some fun with it in the future, but not more than that. Burda don't do it for me. 

Till next time.  


woensdag 13 december 2017

Rococo gaga


yeez... I have been lazy couple of months about writing at all. I mean, I have made several new things and wrote nothing about it, I have to do some cathing up. So first things first. beginning this year I had the annual elfia in Haarzuilens in april where I made a big, and I mean really big costume. 
I gave it the name: rococo gaga, beacause... yeah, you can see why....
It was a bit of an madness to make.....
The dress, is made from table plastic, have you ever sewn plastic with an sewing machine? I calling MADNESS! Really, at some point I couldn't put the plastic under the sewing foot, so there was no other way to staple the many layers plastic in the side where the skirt is with a stapler... hahaha *looks a bit gaga out her eyes*


In the end, there a very few photo's made, and the dress began to fall apart at the end of the day... yeah, you still are wearing plastic, and the movements you make, the bodyhead that lives onder the bodice can't go anywhere, so the plastic began to weaken at some points. the dress lives, plastic isn't maked for something like a hole day of walking, moving, rubbing and go on. I really loved it to wearing it, but it was also very exhauting. My head was screaming at the end of the day. The wig is glued on my forehead, instand botox!! And also walked more side way....The dres itself wasn't that heavy, but there where things I couldn't do, like go to the toilet, or sit like a normal person. 


At some point the dress began to vaporize and I began to catch flies under my plastic skirt, and yes you could see them....

I did knew before I began to make the dress that the evaporation would happen, so I wanted that every layer under the dress would be from natural fibers. So my first choice was cotton. Printen cotton. I knew I would lost a lot of water and I wanted that the under layers where easy to wash afterwards.


In this picture you can see clearly the evaporation in the sleeves.

So for my choice of fabric colors and prints....
The dress itself arise from the idea of an fairytail. I made it my one with an colorfull twist. Because you can litterly look through my outer layers in to my underlayers. I based on the fairytail `the emperor without clothes´
But I made a gender swap and it became `the empress without clothes´. I didn´t want to be completly be naked under my see through dress and considered some options for underneed. what for colors, or underpinnings. And after some concideration I wanted something colorful, with many patterns and that was almost wrong. So I had to do pattern matching and search for a color scheme that would please the eye, but also make the eye a bit twitch. 


I began with the under clothes. I used many different patterns, all of them from commercial brands.

For the shirt I used Simplicity 5359 . For the bloomers I used simplicity 2777 , I sewed not two but four pockets in and on this pants, I dind´t plan to sew that much of pockets, but I decised later I wanted other pocket on the pants who you could see, and I never took the other pockets out, so, yeah... four pockets... The where quite usefull. I don´t have pictures where the two new pockets are yet sewt on.


So the stays where next, the fit very nice, I think it is my first pir that fit that great. I like the figure they give me, and I will use them even with more historical correct 18th future dresses. Until I have made a more historical correct pair of stays in a more... neutral colored fabric.The pattern I used for this pair of stays are butterick 4254.
I have made stays before, but never they fit that good as this pair.


So here are the huge panniers in progress. I like the size, but the overall look was a bit a dissapointment for me, also they are not so stable because they rest on a couple of strings. I want to make a new pair of this size of panniers, but than a full fabric body so that the boning cant swing to much as it do with the strings. I used simplicity 3635 as my guideline, and the new pair I use for the full fabric body panniers. The new one, would be for more historical based dresses.
I dind´t make any progress pictures after this one, the plastic dress is made from simplicity 3637. These patterns are not printen anymore, but you they are still fnd them at etsy or ebay.


So this is it for my rococo gaga. I want to wear it again, but I can´t do it without help, and have to fix the dress at some points. Perhapes I can wear it for a photoshoot where I can get help with make up, hair and dressing. So fingers crossed for a next time of wearing.
 

zaterdag 26 december 2015

raven rococo

Gala Nocturna March 2015, Theme: The swann princess.
This was my first edition of the beautyfull ball and I loved it!

The dress I made for the event was not particular typical swann material :p after this evening I had weare it on elfia Haarzuilen 2015.

Here are the pictures, first from gala and then from elfia. after these pictures there is the making part of the dress.


 Feeling evil swanns with my dear friend Juul :p


This are a pare of pictures of the evening.


 These are a few the pictures of elfia Haarzuilen 2015

I like it when I look thinner then I truly am, and then I mean my face. The dress need some adjustments to a closer fit to my stays. At this point i'm working on these adjustments these holidays. 

So when it is better weather I can wear it again, but without the feather things and a better fitting. It is a little make-over for the dress. If it is done and I have new pictures I show them here ;)


Look at these shoes! I found them just before elfia and the choice was quickly made wich shoes I wanted to wear.


A last one for the castle of Haarzuilen :p


So for the making part...


 First the stays..

 I followed the pattern of J.P. Ryan, Strapless stays. these stays where more for the working people. The fit is shorter and the form is more right.


It is not real historical right, it is just like a mix of modern techniques and a pair of look a like old techniques. 

Here do you see the lining, not very interesting. It is made of broken-white canvas. 


The outer fabric is made of printed linnen with flower motif.

You can see here the mixed techniques, I used metal boning with cutted shoelace. The stays are half boned.


 Because I didn't quite follow the historical guide lines, I thought why not more decoration. So I pinned lace on the front before I hand sewed the bias tape.


 The last phases of the stays where sewed by hand, because it wasn't possible for machine sewing.

This picture you see is the back were I sew the linning throw the interlining and the outer fabric for against shifting when I wear it.
This is again an mixed technique, first the metal eyelets and then hand sewing for covering the metal, and I must say, my eyelets where never so strong.


J.P. Ryan, Strapless stays
 So this was the end result of the stays, I love them very much, but I want new one, better fitting ones, with straps :p

But the flower printing I do assured for an other time again.

The back of the Stays.
 I'm sorry for the terrible photo's, but this is what I have.

the panniers you see badly have I made a couple of years ago for another rococo-ish dress. But more over that project later.

Here you see is the lining and the innerlinning for the dress. The bodice is boned and I used a more costuming pattern than more a historical correct one.

I used simplicity 4092, and made adjusments for the length and the closure. I made a side front closure, because I hate zipper closures in the back. I made the skirt and the dress  knee long.
 Here see you progres pictures from bodice and skirt. The sleeves here alraidy made, but only pinned on the bodice. I have better pictures of them when I made them, but that is for later after the body.
 The overall look begins to look better and better.
 Oh this was such horrible thing -.-" These ruffle thing are synthetic taffeta and because my sewing machine was not such a strong thing, everything of that stuff had to made with handsewing. Metres of taffeta are in this ruffle. 
And finally after many, many hours of hand stiching, the thing was on de dress.


 So with the new adjusments i'm gonna free the front from the dress and make a new stomacher that must be pinned with dress pins when I want to wear it. But for now you see the system what on the certain moment is on the dress.

I make de closing with big snaps and the ruffle hide the gaps of the closure.


 The sleeves! because I didn't find the right red lace, I made the under ruffle with the same taffeta as the ruffle.


 I decorated the underruffle with an ribbon with beads.
simplicity 4092

 So these was the total overall look, but there were some jewerly and shoes that I want to share.


 I found these rings on alixpress and lost only 5 € for the rings.
 So the rings got a make over with some stuff I had left over in my stash.
 These necklace was just assembling, nothing very special.


 So, for the gala I bought some ballet shoes, I don't know how to call spitzen or spointes in English. These shoes were not very expensive online, but there quality is realley bad. But for me it was not a problem because it was only for an evening and I don't dance in real life.

But the only shoes I found were pink, so I painted them black with spray paint. you can see the result on the photo below.


So this was it for today again. I don't think i'm gonna post over venice, it was not a very good experience. Only the costume museum was interesting for these blog. 

Greets Jessie.


ochreous medieval dress

This is an dress i love very much, I made it in November 2014 for an event in December. But is seen for other people like an sort of invisibility cloak.... I have heard thing where my tose go crook from...
thing like "yellow is the color of the whores..." or "this dress do you look like a poor woman..." uhm, yes.... that sure are the compliments I want to hear if you made the dress only by hand.... okey, I choose this color because I didn't want to be rich, because I don't have the money to be look rich.... seems logic... 

But alright, because the dress has also an effect on the photographers, because they don't see me literaly, I don't have many pictures of this dress. And I mean good pictures. 


 So because i have not really a good picture when i weare it and you can see how it is falling, I have here the dress on my mannequin.
 The side of the dress, yes I have tail hanging from my belt.

I had the luck or the unluck... it's how you look at it with al that snow and coldness, and a clothing shange in the snow... 

but I have a pair pictures of this dress in the snow, but because it was freezing, I had a fur skin over the dress... So you can't see the dress properly. 


 Here is another one, but you can see, it is not very good blog material.
 I have made an chaperon, but it was not really good, I have plans to make changes to it. But that is for later on... when I have time for it.

So for the making part I have more interesting pictures. 


 This is not my pattern, I fount it on the web, but I haven't the source anymore.

For the surcotte or "over" dress, I used this instructions and I found them very good. you don't need very much fabric to make it. 

I measure my length from shoulder to toe and take it dubble. 


 So when I cutted the parts and sewed de big parts together. belief me, it is not so impresive that part. I went to made hem from this dress. I don't no how to call hem.. hemming.... euhm... I thing you get the point :p

At first I sewed like this, but I wanted more color in the surcotte and saw my leftovers wool of school in the corner and began hand sewing again and the pictures below are the result of it.

my underdress is made of simple brown-grey cotton, I wanted linen but I din't find the right color  for this project.

the yellow dress is made of real wool, it was very nice in the winter... In the summer, mwaaah.... it go's, but not very recommended.
you see my underdress has the same finish as the over dress.
 For this project I gonna leave it for today, i'm sorry that I have not updated this blog for a month. It was a busy time. 

greets Jessie. 


zondag 22 november 2015

fairy bonbon

Maybe you see it, yes my blog name is inspired by this character and costume. This costume has a large meaning for me, it has a story just like other costumes. But this story has a bad ending, because this dress died in the washing machine.... and cried that I did, and still i'm mourning about this dress. but the charachter is not dead, still pretty alive in me off course.

one day I shall make an new dress for this character, but first her story.

April 2014, elfia (elf fantasy fair) Haarzuilen.

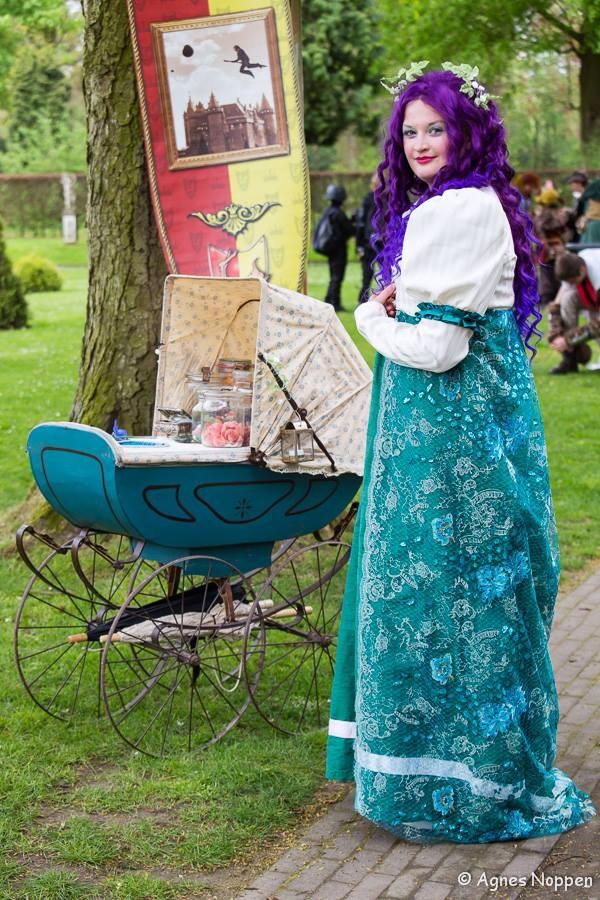
 This was the day my dress got an other meaning than it was only a dress. When I made the dress, it was the intention that the dress was not big! large! and not even impresive. My idea was to lay on the attention to my antique baby carriage (from around 1900's) that I turned to a candycar.

I made the costume so that I had an act that was interactive with children. I was the candy fairy and if the children dare to grabble a candy they had an treatment. The story goes that I passed by a lane for the second time that day, an boy of a market vendor that the first time picked a candy, yelled to his father something in french (I dind't understood what he said) but one word I understand perfect: fairy bonbon.

His father came to me again and the shy boy stood after him and told me, his boy asked a couple times of the fairy bonbon yet should pass by. my haert was touched of that thing, the little boy had waited a couple houres, watching, when i passed by so he had the change to ask me for an other candy. And ofcourse he received some candy.

That day I realised that it is not only the costume that matters but also the character that you play. I love fairy bonbon, just like the other kids. She is the innocent side that I represent.

So you know why I cried about that dress, it was just like a side of me was destroyed. But there i good new as well, I know what I go to make of the dress. An onderpinning for an new regency gown. But I shall later on tell you more about that. first this project.


Photographer: Anges Noppen

So here do you see the dress, with spencer that I made if it was what colder and the turqouise baby carriage. I bought that thing in this coolor, but i'm planning to renovated the thing in her original disign.


 Here do you see the dress without the spencer. This photo is taken on castlfest that year.
 The wig that i'm wearing is gluwed on my forehead, a really dissaster if you try is off....
 Maybe you recognize him... but yes, he is the friend where i'm king with at the certain moment of elfia (2015-2016). On this picture we had met just a few houres a go. And he promised me that day if he wanted to by king of elfia, he wanted me as his queen. lol. and it happend, it was funny if you know that we never met before and that day we where most of the time on the same pictures, because ours colours matched perfectly.
 Here a detail without the spencer. it is a pitty the dress is shrunken and the wild silk is not that pretty anymore. Some ribbons where also a little bit antique and are now bright yellow then pearl white...

I fount this picture look very innocent. A little bit the reflection of the character.


So for the making part.

This was one of the first dresses where i made underwear for. the green dress is made of butterick 6630, and as for more dresses, i made some adjusments. for de spencer as well for the dress.


The underpinning was made of  Sense and Sensebility: a regency underthings pattern.


When I'm gonna make a new regency dress, I will make long stays because that should better with my posture. But for then, i have my short stays. The shift is very basic and dind't need any replacement yet.


My beautyfull green wild silk :'( It was really my precious.. but good, the store where they sell it, is it very buyable. it is 100% wild silk, and that was the suprise. it was under the 10 € t/m

So I think, i'm goining to buy new green silk and make a better one :p


 Here do you see the beginning of the bodice in progress and a chemisette I never ussed. The pearls are pinned, just like de medallion.

Back view, beacause I dind't like the lace closure of the pattern I made a button closure.


 On this picture you can see that the skirt and the lacy fabric are attached on the bodice. For the lacy fabric was an own attachment.

Here you see that is was handstiching for the little beads. It took a little while.


The end product, I made an little riticule (handbag) what here is pinned on for the picture.

I got the lacy fabric from a dear friend of my, she given me at my bithday a year before this project.


I know that er not very much photo's are from the making part. I'm sorry for that.
But this is the story after my fairy bonbon character. And I know that you now why I choose for the blogname Lady BonBon.


This pretty girl is an German carriage from around 1900. The original was a brown bin with white leather coating. I bought him when he was already blue.

But for later, this is an other project for in the future.


Here do you see what i hade in my candy care... nomnomnom, even an fairy had it difficult :p The blue hole was the grable hole for the children.


So, for the next time, it will be my experience of venice...

Greets Jessie :)